

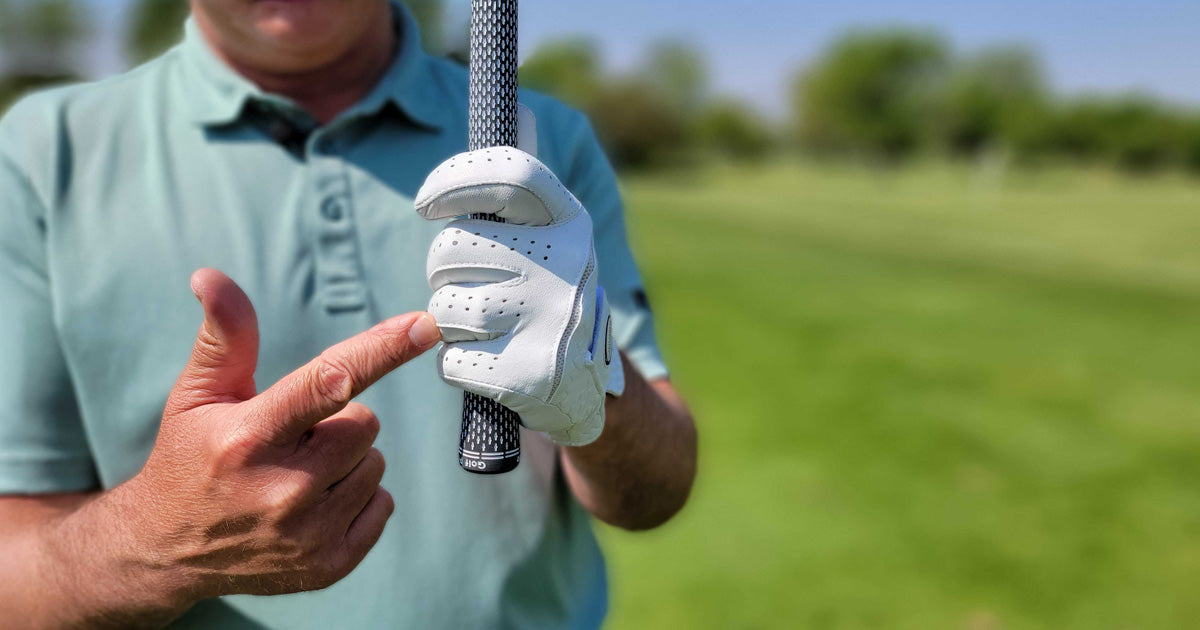
There’s a good chance you’re holding the club wrong. Most amateur golfers do. And the worst part is, they’ve got no idea and no way to see their mistakes if they don’t know what they’re looking for.
The result?
Inconsistent contact, lost yards, and a lot of preventable frustration.
Let’s avoid that. I’ll tell you the three most common golf grip mistakes amateurs make so you can look for them in your own technique. You’ll also learn the correct golf grip using a simple, 5-second grip process that’s easy to repeat for every shot.
So stick around. It’s the little stuff like this that makes the biggest impact on your game.
Correct Golf Grip Takeaways
Here’s a quick look at everything we’re about to cover:
-
Most amateur golfers make at least one of these three golf grip mistakes:
-
Gripping the golf club in the palm instead of the fingers.
-
Using a weak grip instead of a neutral grip.
-
Leaving a gap between the thumb and the rest of the hand.
-
Overcome these mistakes and ensure a correct golf grip every time using the 5-second grip process.
-
Check out VLS Coaching for more straightforward instruction and personalized guidance.
Golf Grip Mistakes
I’ve been coaching golf for over 30 years, and in that time, there are three mistakes I’ve seen time and time again.
If you recognize any of these mistakes in your own grip, don’t worry. You’ll learn how to grip a golf club properly through a simple process that eliminates these errors for good.
Here’s what to look out for:
Mistake #1: Gripping in the Palm
If you hold the handle in the palm of your lead hand, you’re severely limiting your ability to hinge the club and take it up in the backswing.
What you want to do instead is hold the club in your fingers. That’s going to give you more freedom and control in your hands, setting you up for a solid golf swing.
Now, if you’re not sure whether you’re gripping the golf club in your palms or fingers, all you have to do is take a look at your golf glove. If you see a lot of wear on the glove around the pad of your palm—especially if you haven’t had the glove that long—you’re probably holding the club wrong.

Mistake #2: The Weak Lead Hand Grip
First, let me clarify the difference between a strong grip and a weak grip.
In a strong grip, your lead palm is rotated toward the ground and you can see a lot of the knuckles on that hand. If your palm is fully facing the ground and you can see all your knuckles, we’d call that an extremely strong grip.
In a weak grip, your lead palm is rotated toward the sky and you can see maybe one knuckle. If you’re not seeing any knuckles, you’ve got an extremely weak grip.

A lot of amateur golfers have a weak grip, and this hurts their swing in several ways. A weak grip makes it more difficult to square the clubface, it diminishes your clubhead speed, and it hinders your ability to hinge the golf club.
For most golfers, a neutral grip is ideal for maximizing your power off the tee and in your iron shots. In a neutral grip, you’re seeing about 2-2.5 knuckles.
Mistake #3: The Thumb Gap
If there’s a space between your thumb and the rest of your hand, you’ve got a thumb gap problem. This is an issue whether the gap appears on your lead hand, your trail hand, or both.
That space compromises your ability to control and stabilize the golf club. It allows the club to move around during your swing motion, and you can imagine how that would destroy your contact and ruin your ball flight.
If you notice this in your own golf grip, close the gap.

How to Grip a Golf Club
Now, knowing how to correct your golf grip mistakes isn’t the same as knowing how to grip a golf club. We want to make sure you’ve got a seamless routine for a correct golf grip on every shot you take.
I’m going to walk you through all the steps of a 5-second process that’s going to ensure you grip the club the same way every single time. It might look like a lot of information at first, I’ll leave you with a simple checklist to work with until this routine becomes a quick habit.
Step 1: Let Your Arms Hang at Your Sides
Easy enough, right? Just let your arms hang and your hands fall wherever they fall naturally. Relax your shoulders and hands. You’ll likely find that your hands naturally fall in a relatively neutral position.
Step 2: Grip the Club in the Fingers of Your Lead Hand
You’re not lifting or moving this hand yet. Leave the lead hand in its natural, neutral position at your side and hold the club with your fingers.
Step 3: Close the Thumb Gap
Check your lead hand. If you notice a space between your thumb and the rest of your hand, close the gap.
Step 4: Hinge the Club
Don’t lift your arm. Simply hinge at the wrist to raise the clubhead up and down a few times. This should be easy.
If it’s not easy, check your grip. Is your lead hand still in a neutral position? Are you gripping with your fingers? Have you closed the thumb gap?
If anything seems off, fix it and try the hinge again. Once you’ve got it, move on to…
Step 5: Hold the Club Out in Front
Lift your lead hand out in front of you so you’re at about eye level with the clubhead. Take advantage of this direct perspective and square the clubface and check to make sure you can see 2-2.5 knuckles.
Step 6: Add the Trail Hand
Lift your trail hand with your palm facing the target. This is neutral position for your trial hand. Maintain this orientation as you add it to the club handle, holding the club in the fingers just like you do with your lead hand.
Step 7: Overlap or Interlock the Fingers
Complete your golf grip by either overlapping your lead index finger and trail pinky finger (this is what I have most of my students do) or, if you prefer, interlocking them.
Step 8: Take Your Setup Position
Tilt your upper body and rest the clubhead on the ground. You should now have the correct golf grip.
Now let’s simplify that with a checklist you can take to the golf course.
5-Second Grip Process
-
Let your arms hang at your sides with your hands relaxed in neutral position.
-
Grip the club in the fingers of your lead hand.
-
Close the thumb gap.
-
Hinge your wrists to move the club up and down a few times. This should be easy.
-
Hold the club out in front.
-
Square the clubface.
-
Make sure you can see 2-2.5 knuckles.
-
Raise your trail hand with the palm facing the target and add it to the club handle.
-
Overlap or interlock the lead index finger and trail pinky finger.
-
Tilt your upper body forward and take your setup position.
The Best Way to Eliminate Swing Mistakes
Once you check your grip for those three common mistakes and add the 5-second grip process to your routine, you’ll see what a huge difference a small fix can make.
This is why personalized coaching is a great idea for anyone who’s serious about improving their golf game. A qualified instructor can instantly correct bad habits that have been plaguing your game for years. And it’s more affordable than you think when you join VLS Coaching.

VLS Coaching is an online program that gives you a direct connection to me and my team. You get unlimited personalized swing analysis from me, access to live coaching sessions, a standing invitation to live Tee Times where you’ll learn from experts from all corners of the industry, and more.
You can participate from your own home on your own schedule and still enjoy all the perks of interacting with a friendly community and coaches who tailor their approach to your priorities.
Best of all, our instruction is rooted in the VLS System—a golf method designed specifically for the everyday golfer.
Ready to make real progress? Join VLS Coaching here.
About the Author
PGA Teaching Professional Todd Kolb is a five-time Golf Digest Best-in-State Instructor, Amazon Best-selling Author, and Minnesota PGA Teacher of the Year. In over 30 years of coaching, he’s worked with from newbies to an LPGA major champion. He’s currently the Director of Instruction for VLS Golf and USGolfTV and dedicates his efforts to helping the everyday golfer cut through overcomplicated traditional instruction to find solutions that actually work for them.





Share:
How to Hit Irons: The Ultimate Guide for Amateur Golfers
This Simple Putting Stroke Is the Secret to Lower Scores